
Wire Wrap Button Ring Tutorial
by Jessica Curry.
(Curry Designs Handmade)

Make a wire wrap ring with a button on top
I couldn’t wait to share this tutorial with you once I made this ring. It turned out adorable!
All you need is:
18 gauge artistic wire (I am using silver plated wire)
button (not too big)
needle nose pliers
mandrel
Photo 1:

First what you need to do is cut a piece of wire about 2 feet long.
Insert wire through top two holes in button like it shows in the photo.
Then, flatten wire on back of button to make a straight line.
Wrap wire around mandrel. You should start wrapping an inch larger than the size you want. After twisting and tightening the wire, the ring will shrink in size. So if you want to make a size 7, start wrapping at the size 8 mark.
Photo 2:

Wrap on each side of button 2x.
Take wire off mandrel, hold end of wire and wrap across like so in pic.
Photo 3:

Wrapping around wire 2 to 3 times then cut with pliers.
Now do the same to the other side and cut.
Photo 4:

Now mend your ends by using the flat part of the pliers.
Last put the ring back on the mandrel as far as it will go to get back in shape.
wire wrap button ring
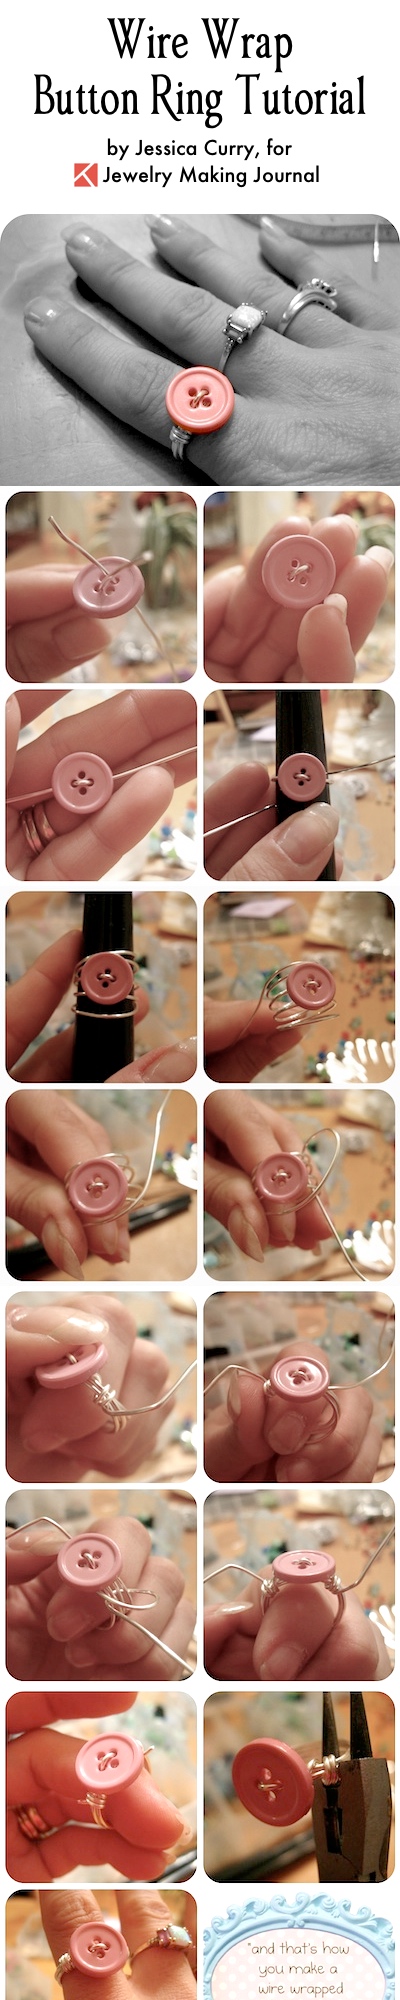
Tada! You’re done!
Jessica Curry
Curry Designs Handmade
Comments:
wire wrap ring with button
by: Rena
Thanks so much for this nifty, easy tutorial, Jessica! This is another fun project for people of all ages – and what a great way to use interesting leftover or antique buttons.
I really appreciate your sharing this project here with us!
Thanks
by: Irene
Jessica, thanks for sharing and also for the very instructive pictures. I can’t wait to try this!
Your welcome!
by: Jessica
You are certainly welcome!! Thanks for posting it!
Jessica Curry
http://www.currydesignshandmade.com/
Button Ring
by: Diana
Hi Jessica,
I love your easy tutorial.
I made another ring with a vintage button with a shank. The only thing you do differently is this, wrap one side the way you do in the tutorial and on the other side before you make your second wrap gently go around the shank once or twice depending on the button and then wrap the second side. The wrap around the shank protects the vintage button’s shank and keeps the button from flopping over.
Thank this was very fun!
Diana
Nice!
by: Marina
Thanks Jessica for this super cute tutorial!
