
Stacking Copper Bracelets (Tutorial)
by Rena Klingenberg. © 2003-Present Rena Klingenberg. All Rights Reserved

Make a fashionable stack of copper bracelets – there are endless ways to mix and match a collection of cuffs!

I like stacking one fancy cuff with two plain ones – but you could also create a stack where each bracelet has a unique, special design.
And if you’re selling them displayed as interesting stacks or mix-and-match deals, you will probably have a lot of people looking at them.

Supplies:
- Copper sheet, 22 or 24 gauge.
In this tutorial we’ll make 3 cuff bracelets:
– 2 bracelets that are 1/4″ (6cm) wide
– 1 bracelet that is 1/2″ (13cm) wide.So to make these 3 bracelets, you’ll need a piece of copper sheet that’s at least 1″ (25mm) wide (1/4″ + 1/4″ + 1/2″); and as long as your wrist measurement minus half an inch (13mm).
Example: If you want to make these 3 bracelets and you have an 8″ (20.32 cm) wrist, your copper sheet should be at least 1″ x 7.5″ (2.5 cm x 19.05 cm).
Most jewelry suppliers that carry metalworking stuff carry sheet metal. I got mine online from Monsterslayer.com.
(If you’re going use a patina, alcohol ink, or some other finish on your bracelets, make sure your copper has NOT been varnished. Many craft-store and hardware-store metals have been varnished).
- Ruler – to measure and mark your bracelets on the copper sheet.
- Ultra-thin Sharpie marker – to mark your copper sheet.
- Tin snips, metal shears, or other scissors that can cut 22 or 24 gauge metal.
(Find them at jewelry suppliers, hardware stores, and home improvement stores.) - #0000 steel wool (a few small pieces) – for smoothing the edges and surfaces of your bracelets.
- 2 flat buttons, one medium size and one small – to use as templates for rounded edges.
- Bracelet mandrel (or dowel, PVC pipe, chair leg, vitamin bottle, or other sturdy item that’s about the same circumference as your wrist).
- Plastic, rubber, nylon or rawhide hammer for shaping your metal around your bracelet mandrel.
- Ball-peen hammer (metal hammer with a round ball on one end of the hammer-head) – for texturing one of the bracelets.
- Any other supplies needed to embellish your bracelets – metal stamps, alcohol inks, patinas, texturing tools, etc.
How to Make
Stacking Copper Bracelets
CAUTION: The edges and corners of your sheet metal are as sharp as a knife. Handle with extreme care to prevent injury.
We’ll start by marking our copper sheet for the 3 bracelets.
So get out your copper sheet metal:

. . . and use your ruler and Sharpie marker to mark the outline of your 3 bracelets on the metal.
You can see I’ve measured for 2 bracelets that will be 1/4″ wide, and one that will be 1/2″ wide:

Now get out your metal cutting shears (these are my shears):

. . . to cut out your three bracelets:

My metal was a bit longer than my bracelets will be, so I also marked and trimmed off the extra metal from one end of each bracelet:

Now we’re going to round the ends of our bracelets so they’ll be more comfortable.
To make my rounded cutting line, I’m tracing around the edge of buttons, on both ends of each bracelet:

Use your metal cutting shears to cut along your rounded lines on both ends of each bracelet:

Now each bracelet should look something like this:

It’s time to smooth off every edge, curve, and surface of each bracelet.
Get out your steel wool and tear or cut off a small piece.
(After tearing off a piece of steel wool, I dampen it with water to help prevent shreds of it from becoming airborne as I work with it.)
Now use your damp steel wool to “sand” your bracelets until every edge and surface is smooth:

When your bracelets are completely smooth, it’s time to shape them around your mandrel.
Place one of your bracelets across your mandrel:

. . . and use your thumb to hold the center of the bracelet against the mandrel, shaping the bracelet around it as much as you can with just your fingers:

Now wrap your metal tightly around the mandrel.
Use your nylon, plastic, rubber, or rawhide hammer to pound every part of your bracelet, from the center to the ends, shaping it to the mandrel:

When you’ve finished hammering your metal into a nice sturdy bracelet, it should look like this:

Now follow the same procedure to shape your other 2 bracelets around the mandrel.
When all 3 bracelets have been shaped around the mandrel, choose one of them to texture with your ball-peen hammer.
Put the bracelet to be textured back on the mandrel, and use the ball-peen end of the hammer to pound dents all over the bracelet:

Here’s a hammer-textured bracelet next to a smooth bracelet:

Although I’m leaving the other 2 bracelets plain (I like the look of 2 plain and 1 fancy), you may want to embellish your remaining 2 cuff bracelets in some way:
- Metal stamping words, letters, or numbers
- Texturizing with other tools
- Creating a brushed surface with a wire brush
- Adding mixed media elements
- Patinas
- Oxidizing
- Alcohol ink
- Wire wrapping beads around the metal
- Punching holes to attach other components
- . . . whatever you can imagine!
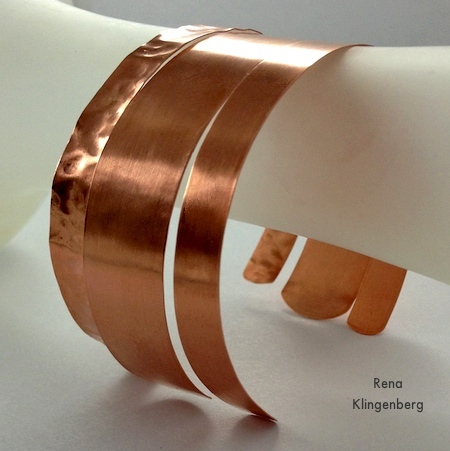
My finished stack of bracelets consists of 1 narrow hammered cuff, 1 narrow smooth cuff, and 1 wider smooth cuff:


