
Loops & Hoops Earrings (Tutorial)
by Rena Klingenberg. © 2003-Present Rena Klingenberg. All Rights Reserved

These fun hoop earrings are super dangly and swingy! 🙂

Part of the fun is choosing which jewelry link shapes to combine together.

This is a fast and easy project that yields great results. It would be ideal for a jewelry party or a beginning jewelry workshop.
Supplies:
- Jewelry connectors / jewelry links in a variety of shapes and sizes.
I purchased all of mine from various Etsy.com vendors, but other jewelry suppliers carry them too.
You can do a search on Etsy.com or just on the internet for phrases like:
“square jewelry connector”
“circle link pendant”
“jewelry teardrop links”.
If you can’t find them anywhere, consider making your own out of wire. - A pair of earwires.
- 2 small jump rings (I used 5mm size).
- 2 medium jump rings (I used 9mm size).
- Flat nose and chain nose pliers – for opening and closing jump rings.
How to Make
Loops & Hoops Earrings
I started by getting out my supplies . . .
a collection of jewelry connectors in a variety of geometric shapes and sizes:

a pair of earwires:

and jump rings – two 9mm, and two 5mm:

Then I chose three jewelry connector shapes to play with:

. . . and arranged them together to see how they’d look as an earring:

When you’re happy with the jewelry connectors you want to use together, pick up one of your larger jump rings with your chain nose pliers:
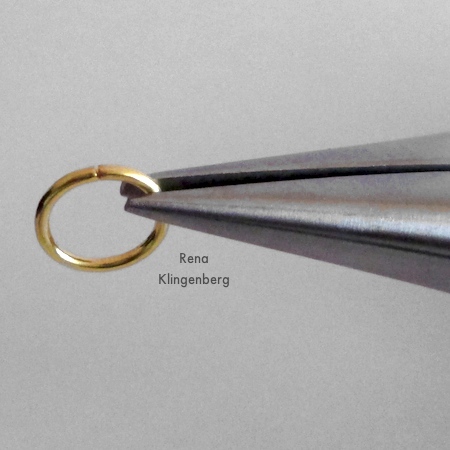
You can follow my tutorial for opening and closing a jump ring.
Use your flat nose pliers to grasp the other side of your jump ring.
Now twist your jump ring open by twisting one of the pliers away from you, while twisting the other pliers toward you:
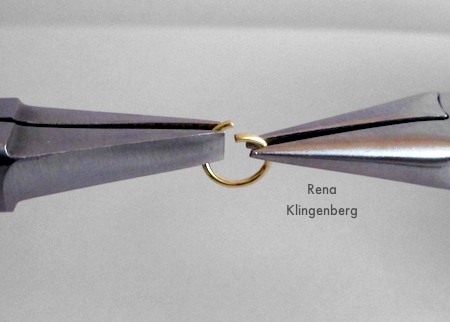
Now put down your flat nose pliers, and hold the opened jump ring with your chain nose pliers:

Start stacking your selected jewelry connectors onto your jump ring.
I started with my big square connector:

Then added my large teardrop connector:

And finally added my small diamond-shaped connector:

When you’ve got all your connectors on your jump ring, use your chain nose and flat nose pliers to twist the jump ring shut again:

Open one of your smaller jump rings and string it onto the larger jump ring you just twisted shut; then string your earwire onto the smaller jump ring, and twist it shut again:

Your first earring is finished.
Now make the second earring the same way.
Your pair of earrings may look like something like this:

Here’s another pair of earrings I put together – they’re a bit smaller than the first pair.
I chose these jewelry connector shapes – a medium size circle, a medium size oval, and a small oval:

. . . and my finished earrings from these pieces turned out like this:

This style of earrings makes a great gift – and they’re so quick to make that you can even make them at the last minute!


