
Changeable Bead Earrings (Tutorial)
by Rena Klingenberg. © 2003-Present Rena Klingenberg. All Rights Reserved

This earring design is an earwire and headpin all in one.
And you can change the beads every time you wear these earrings – using a removable clear plastic earring stopper at the bottom of your beads.

Changeable Bead Earrings – tutorial by Rena Klingenberg
If you give or sell these earrings, be sure to include a collection of beads to mix and match for creating endless unique looks!

These changeable bead earrings are a great style for gals of all ages – and making them would be a fun birthday party or slumber party activity!

Supplies:
- 2 pieces of round 20- or 21-gauge wire; it can be either half-hard or hard wire.
Each piece of wire should be 9cm (3.54″) long.
Use a type of wire that’s appropriate for pierced ears (see my Earring Wire Guidelines).
I used 20 gauge half-hard copper wire. - 2 earring stoppers.
These are little plastic, rubber, or silicone tubes that fit snugly onto the end of an earwire:

They are usually worn to keep hook-style earwires from sliding out of ear piercings.
But in this project we’ll be using these earring stoppers to hold our beads in place on the straight end of our earwires.
Sources of earring stoppers:
You can get these at most jewelry suppliers – they’re often called “earring stoppers” or “earring safety backs”.
I’ve also heard of people finding these earring stoppers in Walmart’s jewelry department. - Wire cutter.
- Flat nose pliers.
- Nylon jawed pliers, or jewelry polishing cloth, or your fingers – for straightening your cut wires.
- Cup bur, wire rounder, or jeweler’s file for rounding and smoothing both ends of each wire.
- Small piece of #0000 steel wool for final smoothing of the tips of your earwires.
- Ultra-fine point Sharpie marker.
- Beads with holes that will fit onto your wire.
- Optional: Jeweler’s steel block (or other smooth, sturdy surface); and a plastic, rubber, or nylon hammer for hardening your finished earwires.
How to Make
Changeable Bead Earrings
First cut your 2 wires; each should be 9cm (3.54″) long:

Now we’ll use your nylon jawed pliers, jewelry polishing cloth, or your fingers to straighten each wire.
Hold one end of the wire firmly with your flat nose pliers, and pull the entire length of wire through the nylon jawed pliers, pulling the wire straight and tight as you do so:

Use your cup bur, wire rounder, or jewelry file to make each end of both wires as smooth and round as possible:

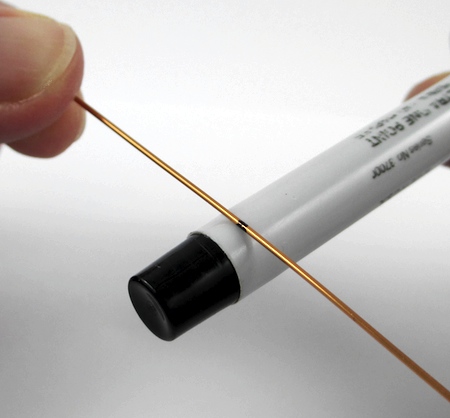
Use your ultra-fine point Sharpie marker to mark the centerpoint of each wire:

Now we’ll work on one of your earrings at a time.
We’ll use your Sharpie marker as a mandrel for shaping the hook of this earring.
Place your wire across the Sharpie marker.
The mark you just drew on the wire should be centered on the Sharpie:
Place your thumb firmly on top of the mark on your wire, and use the fingers of your other hand to bend the sides of the wire smoothly straight downward:

Now your wire should look like this:

Use your flat nose pliers to grasp one end of your wire:

Bend the wire slightly outward at an angle. This will be the end of the earring that is inserted into your ear piercing:

Now your earwire should look like this:

Use your #0000 steel wool to do the final smoothing and polishing on the bent end of your earwire.
Make sure there are no rough spots or sharp points:

Now make your second earwire just like the first one.
Then use a bit of rubbing alcohol on a scrap of paper towel to remove the Sharpie marks from your wires.
Your earrings should now look like this:

Optional: I recommend hammer-hardening your finished earwires, because they’ll get a lot of action as beads are added to and removed from them repeatedly.
Place one of your earwires (without the beads) on your steel jeweler’s block (or other smooth, sturdy surface).
Then use a nylon, plastic, or rubber hammer to pound one side of the earwire all over; then turn it over and thoroughly pound the other side:

Now it’s time to add some beads to the earring!
Choose some beads and thread them onto the straight end of the earwire:

When you have the beads strung the way you want them, gently push the clear plastic earring stopper onto the straight end of the wire, just below your beads:

Now move over to your other earring, add beads and an earring stopper to it – and you’re done!
Of course you can remove the earring stoppers and keep changing out your beads as much as you like. 🙂


