
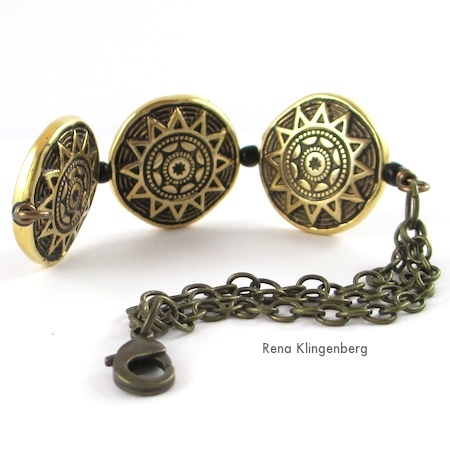
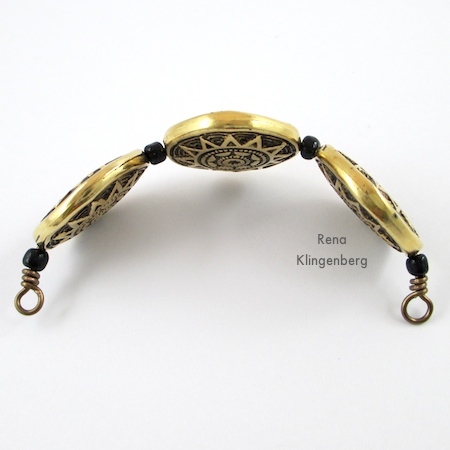
Beads & Chains Bracelet (Tutorial)
by Rena Klingenberg. © 2003-Present Rena Klingenberg. All Rights Reserved

In this tutorial, the beads are strung on round metal wire instead of beading wire.
If you like jewelry with structure, you’ll appreciate how the bead and wirework portion of this bracelet holds its curved shape firmly.

I’ve used three strands of chain here, but you may want to make your bracelet more dramatic and edgy with lots more chain!
Supplies:
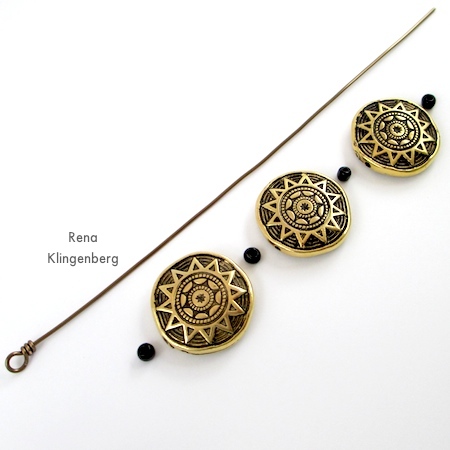
- Multiple flat beads of any size, measuring approximately 3″ (76mm) total length.
Make sure the holes in your beads will accommodate a piece of 18 or 20 gauge round wire.
I’m using 3 round flat (coin-shaped) beads (acrylic with gold plating), each about 1″ (25mm) in diameter. - Size 6/0 seed beads – enough to place one seed bead on each side of each the larger beads.
(The seed beads create little “joints” between the larger beads, making it easier to curve your wire around your mandrel.)
I used 4 black 6/0 seed beads. - Round soft wire, 18 or 20 gauge – approximately 6″ (152mm) long.
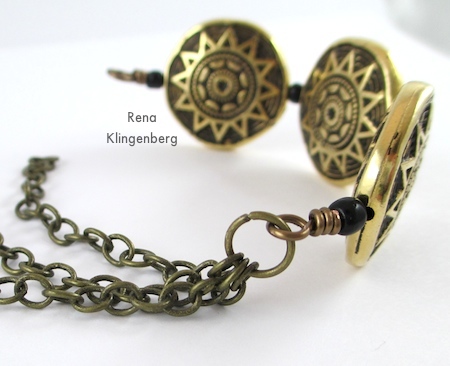
(I’m using 18 gauge Artistic Wire, in “Antique Brass” color.) - Chain of your choice.
I’m using antiqued brass round cable chain, 4x5mm size; 3 strands, each 2.75″ (70mm) long. - 2 jump rings, approximately 7mm size.
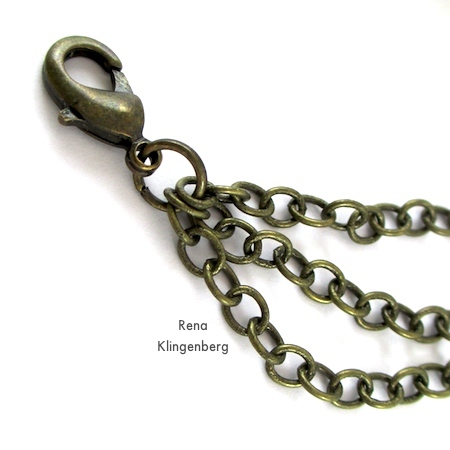
- Clasp (I used an antiqued brass lobster clasp, 15mm size).
- Wire cutter.
- Round nose pliers.
- Flat nose pliers.
- Chain nose pliers.
- Sharpie marker.
- Ruler.
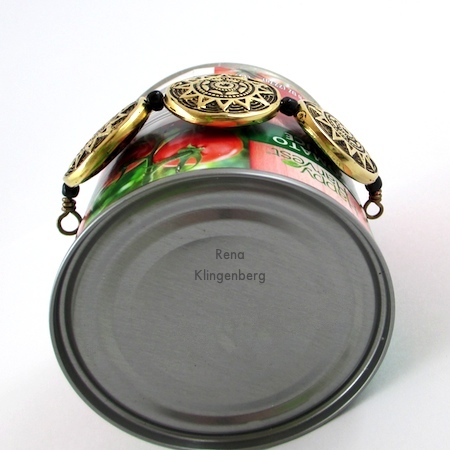
- Bracelet mandrel (I used a tomato sauce can; a small soup can would also work well).
How to Make a
Beads and Chains Bracelet
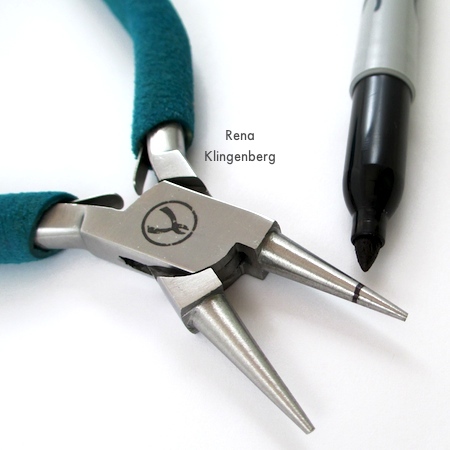
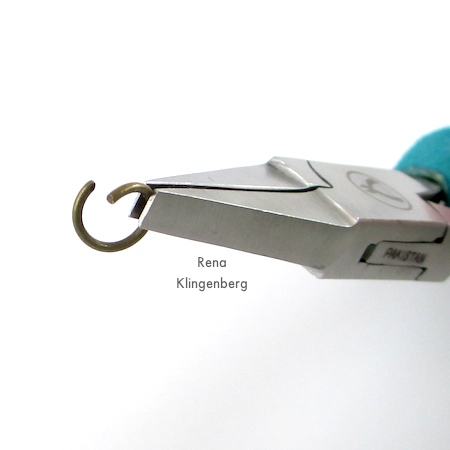
We’ll want to make equal-size wrapped loops at each end of the wire, so we’ll use a Sharpie marker to draw a line on one jaw of your round nose pliers, as shown below.
We’ll use this line for making our loops:
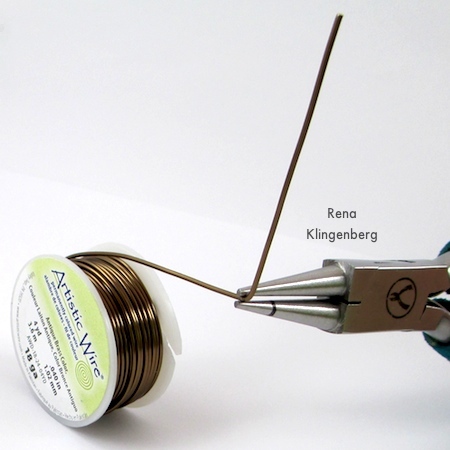
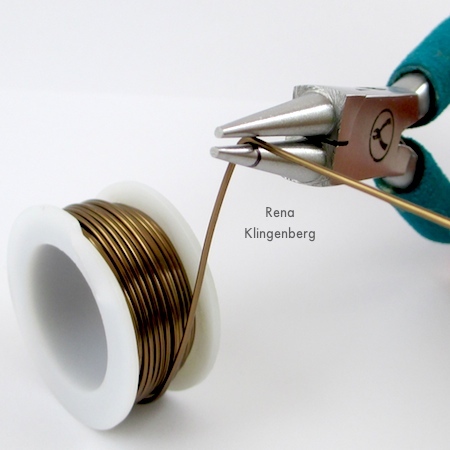
Now we’ll begin by working with our wire straight from the wire roll, without cutting it first.
That way we’ll avoid wasting any wire in this project.
We’re going to make a wrapped wire loop with this end of the wire.
If you’re new to making wrapped loops, see my quick and easy video, Make a Wrapped Wire Loop.
To make the wrapped wire loop, use the tips of your round nose pliers to grasp the wire, about 2.5″ (64mm) from the end of the wire:

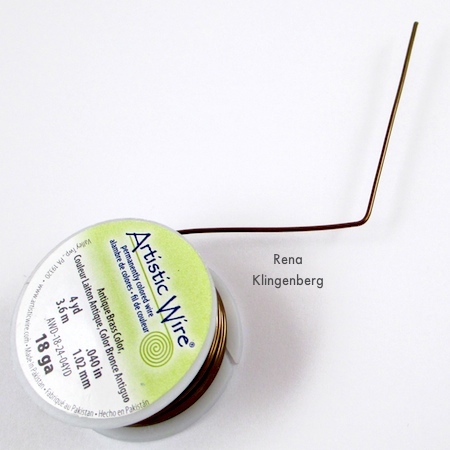
Now bend the wire end at a nearly 90-degree angle:
Your wire should look like this:
Grasp the short wire tail right where you just bent the wire.
The wire should be resting on the Sharpie line you drew on your pliers jaw:
Now wrap the short wire tail around one jaw of your pliers.
Rotate your pliers as needed so you can make a full loop with the tail sticking out to one side:
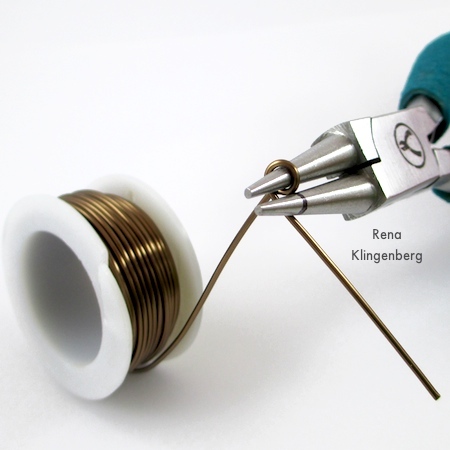
Your wire should look like this:

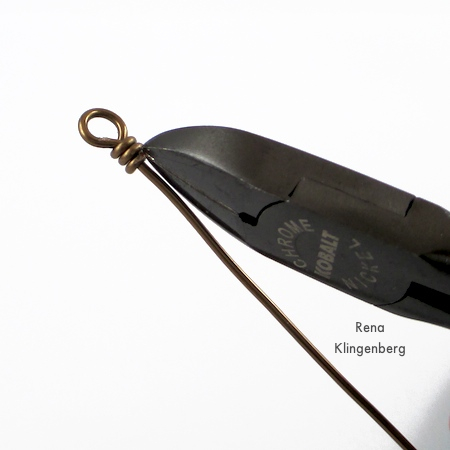
Next we’ll wrap the short wire tail around the wire stem below the loop.
Use the tips of your flat nose pliers to grasp the wire loop you just made.
Use the tips of your chain nose pliers to grasp the wire tail and wind it tightly 2 or 3 times around the long wire stem:

Use the flat side of your wire cutter to trim off the wire end as closely as possible to the main wire stem, and use the tips of your chain nose pliers to squash down the cut wire end:
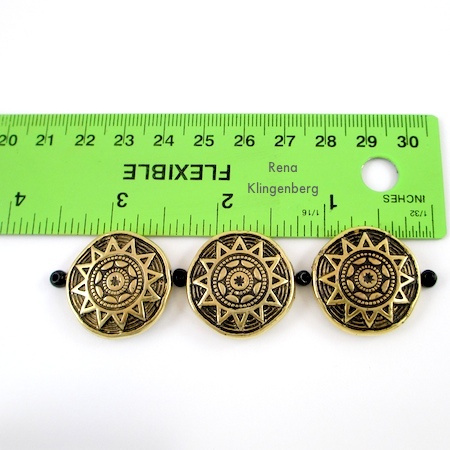
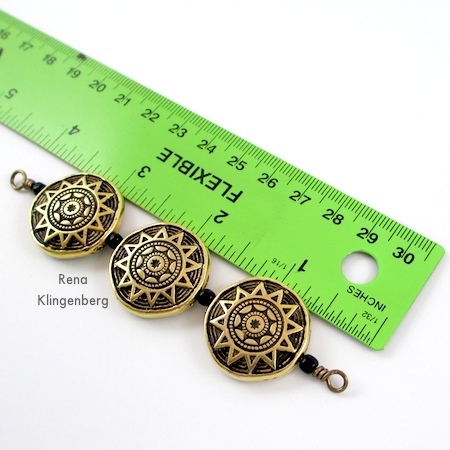
Next we’ll measure your total bead length.
Line up all of your flat beads next to a ruler as shown below, with a seed bead on each side of every flat bead.
You can see my total bead length is about 3.5″ (76mm):
Next we’ll figure out where to cut our wire from the wire roll.
Add 2.5″ (64mm) to your total bead length we just measured.
(In my case, 2.5″ + 3.5″ total bead length = 6″).
Cut your wire to that length (in my case, 6″):
String your beads onto the cut wire, with the beads stacked up against the finished wrapped wire loop:

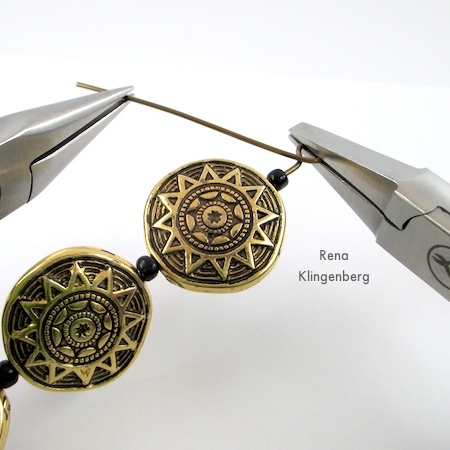
It’s time to make a wrapped wire loop in the unfinished end of the wire.
About mid-way down your round nose pliers jaw, grasp the wire just above your last seed bead.
Bend the wire over one jaw of your pliers at a nearly 90-degree angle:
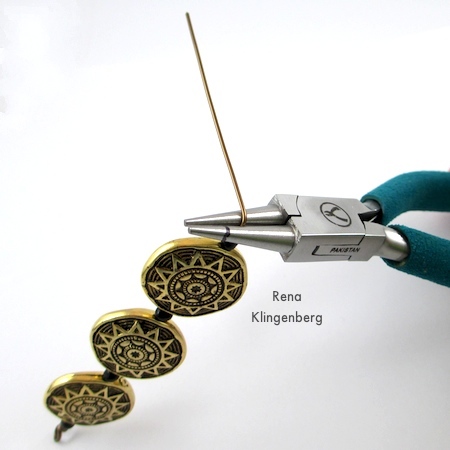
Your wire should look like this:

Now we’ll make a wrapped wire loop, the same way you did on the first end of the wire.
Grasp the short wire tail right where you just bent the wire.
The wire should be resting on the Sharpie line you drew on your pliers jaw:
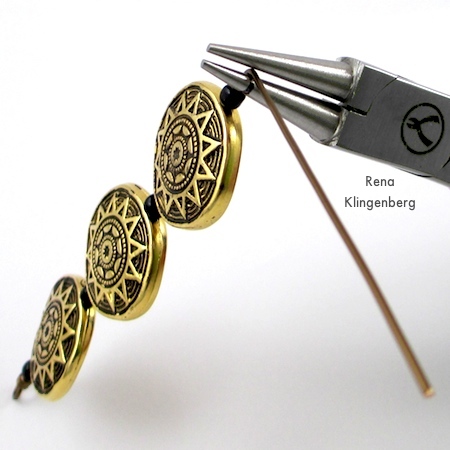
Now wrap the short wire tail around one jaw of your pliers.
Rotate your pliers as needed so you can make a full loop with the tail sticking out to one side:
Your wire should look like this:

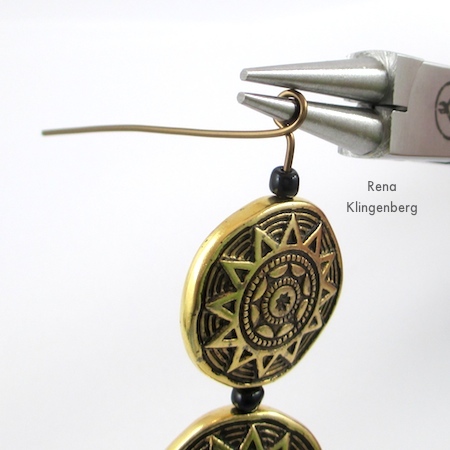
Next we’ll wrap the short wire tail around the wire stem below the loop.
Use the tips of your flat nose pliers to grasp the wire loop you just made.
Use the tips of your chain nose pliers to grasp the wire tail and wind it tightly 2 or 3 times around the long wire stem:
Use the flat side of your wire cutter to trim off the wire end as closely as possible to the main wire stem, and use the tips of your chain nose pliers to squash down the cut wire end.
Your wire should look like this:
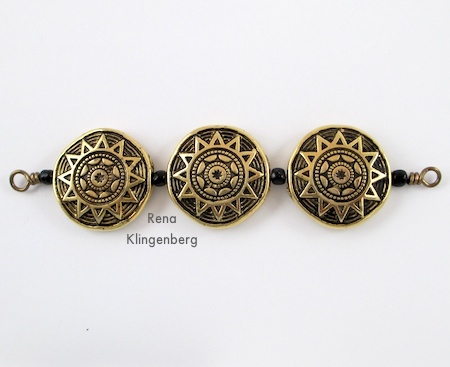
Measure your total finished wire length against a ruler – from the tip of one loop to the tip of the other loop.
You can see my total wire length is about 4.25″ (107mm):
Now shape your finished beaded wire around your mandrel (a tomato sauce can, in my case):
Remove the beaded wire from the mandrel:
It’s time to cut the chains that will finish off the bracelet.
I’m making my bracelet for a 7″ (178mm) wrist length.
Subtract your beaded wire length from your wrist length to get your chain length.
(In my case, 7″ wrist length – 4.25″ beaded wire length = 2.75″ [70mm] chain length.)
Cut 3 pieces of chain (or however many pieces of chain you want to use) in the length you calculated above:

Now use your flat nose and chain nose pliers to twist open one of your jump rings.
If you’re new to using jump rings, see my quick tip, How to Open and Close a Jump Ring.
String one end of one of your chain pieces onto the opened jump ring:

String the rest of your chain pieces onto the jump ring:

Now thread the jump ring onto one of your wrapped wire loops on the beaded wire you made earlier.
Then use your flat nose and chain nose pliers to twist the jump ring shut:
Now use your flat nose and chain nose pliers to twist open your remaining jump ring.
Move to the other ends of your chains, and thread the jump ring through the last link on each of those chains.
Then thread your clasp onto the jump ring.
Use your flat nose and chain nose pliers to twist the jump ring shut:
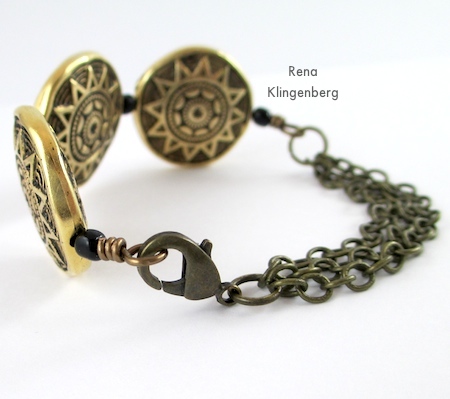
Your beads and chains bracelet is now finished!
To close it, fasten the clasp in the remaining wire wrapped loop of your bracelet.


